
I’m doing my Masters. I have assignments, deadlines, group projects, emails from professors, and about four different apps I use every single day.
Last semester I kept hearing about “automation.” Everyone online was saying you could connect your apps together and save hours every week. So I decided to try it.
I opened Zapier. Then I opened Make. Then I spent the next two hours completely lost — switching between both, watching YouTube videos, closing tabs, opening them again.
Both tools looked powerful. Both were free. Both promised to make my life easier. But I had no idea which one to actually use or where to even start.
If you’re in the same spot right now — this article is for you. I’m going to break down Zapier vs Make for beginners in the simplest way possible. No tech talk. No jargon. Just what I learned after actually using both.
Why This Decision Feels So Confusing
When you first search “how to automate my tasks” — these two tools come up everywhere.
Zapier. Make. Zapier. Make.
The problem is they both do similar things but in completely different ways. And when you’re new, you don’t know which way is better for you.
Zapier feels like filling out a form. Step one, step two, done. Make feels like building a map — you drag things around on a screen and connect them with lines.
Neither is bad. They’re just different. And nobody explains that properly to beginners.
Let me do that now.
What Are These Tools Even For?
Understanding Zapier vs Make for Beginners
Before we compare them — let me explain what they actually do.
Both Zapier and Make are automation tools. They connect your apps so they can talk to each other without you doing anything manually.
For example:
- Every time someone fills your Google Form, the answer automatically goes into a Google Sheet
- Every time you get a specific email, it saves to a folder and sends you a phone notification
- Every time you post on Instagram, it also posts to Facebook
You don’t write any code. You just tell the tool — when THIS happens, do THAT.
That’s it. That’s automation.
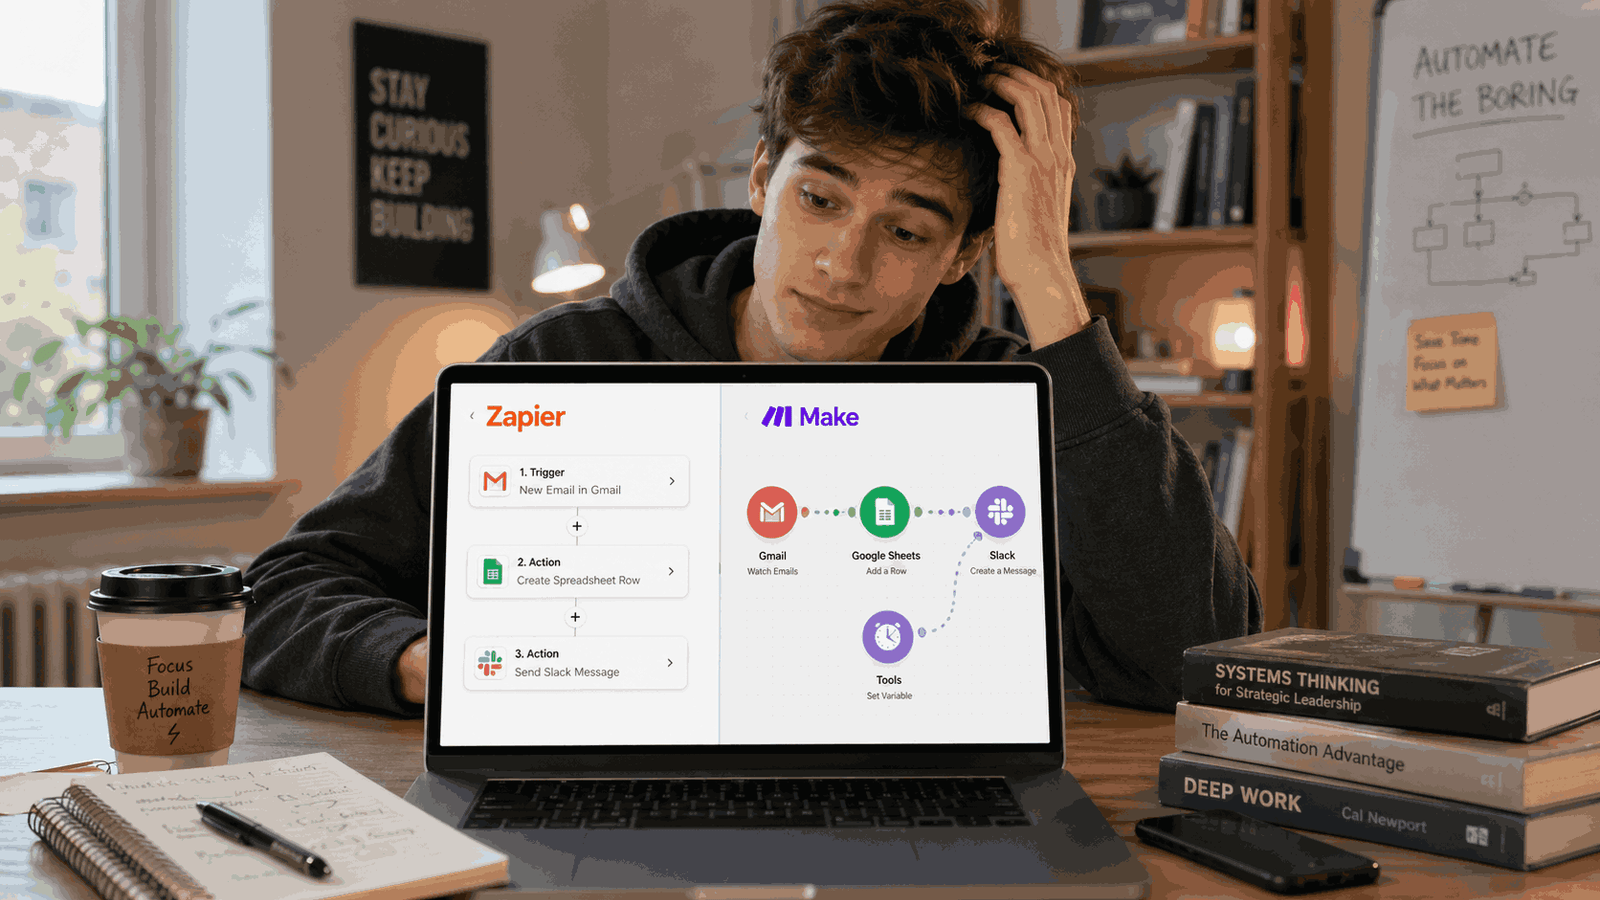
Zapier — What It Is and How It Works
Zapier is the most popular automation tool in the world right now. It connects over 7,000 apps — pretty much everything you already use.
The way it works is simple. You build what they call a “Zap.” A Zap is just two things:
Trigger — something that happens first (like receiving an email) Action — something that happens because of it (like saving that email to a spreadsheet)
The whole setup process is like following a quiz. It asks you questions, you click answers, and your automation is built. You don’t need to understand anything technical.
For a complete beginner, this is really nice. You can have something working in literally 5–10 minutes.
What’s good about Zapier:
- Super easy to set up
- Works with thousands of apps
- Great for simple one-step automations
- Lots of tutorials and help online
What’s not so good:
- The free plan only gives you 100 tasks per month — that runs out fast
- If you want to do more complex automations with multiple steps, you usually have to pay
- Paid plan starts at around $20/month which is a lot for a student
Make — What It Is and How It Works
Make (it used to be called Integromat) is a bit different.
Instead of clicking through a form, you work on a visual canvas — like a blank board. You add little blocks called “modules” and connect them together with lines. Your whole automation looks like a diagram or a flowchart.
It looks complicated at first. I’m not going to lie — the first time I opened it I thought I was in the wrong place.
But once you get used to it, you realise it’s actually more powerful. You can build much more complex automations for free. You can add filters, conditions, loops things Zapier would charge you for.
What’s good about Make:
- Free plan gives you 1,000 operations per month — way more than Zapier
- You can build complex multi-step automations without paying
- The visual diagram makes it easy to understand what your automation is actually doing
- Cheaper paid plan if you ever need to upgrade (around $9/month)
What’s not so good:
- The learning curve is real — it takes longer to figure out
- Fewer app connections than Zapier (about 1,500 vs 7,000)
- Some beginners give up before they finish their first automation
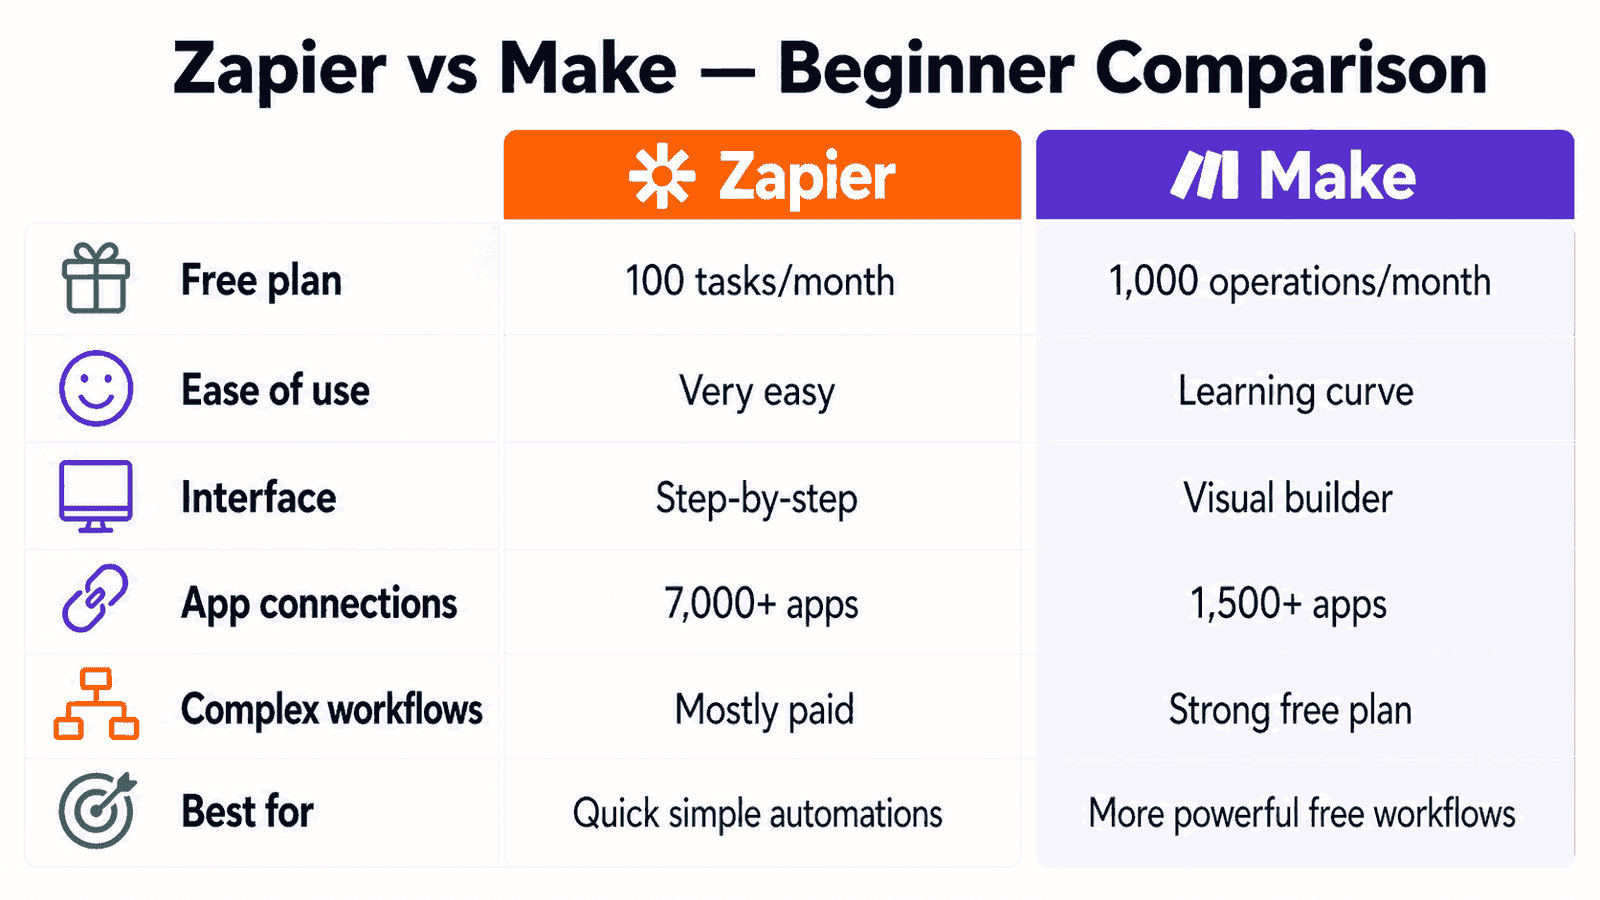
Zapier vs Make — Simple Comparison Table
| What You’re Looking At | Zapier | Make |
|---|---|---|
| Free plan tasks | 100 per month | 1,000 per month |
| How easy is it | Very easy | Takes some learning |
| How it looks | Step-by-step form | Visual drag and drop |
| Number of apps | 7,000+ | 1,500+ |
| Complex automations free | No | Yes |
| Paid plan price | ~$20/month | ~$9/month |
| Best for | Quick simple automations | Powerful free automations |
| Good for beginners | Yes | Yes — just needs patience |
Which One Is Actually Better for Students
Okay, here’s my honest answer after using both.
If you want something working today in under 10 minutes — start with Zapier.
It’s faster to understand. The steps are clear. You won’t get confused. Perfect for when you just want to test automation for the first time.
If you want more power and you’re okay spending an hour learning — go with Make.
The free plan is so much better. 1,000 operations vs 100 is a massive difference. And you can build proper multi-step workflows without paying anything. For a student who wants to actually automate their life, Make gives you more value for free.
My personal experience? I started with Zapier because it was less scary. After a week I moved to Make and never went back. The free plan alone was worth the extra learning time.
How to Set Up Your First Automation on Make — Step by Step
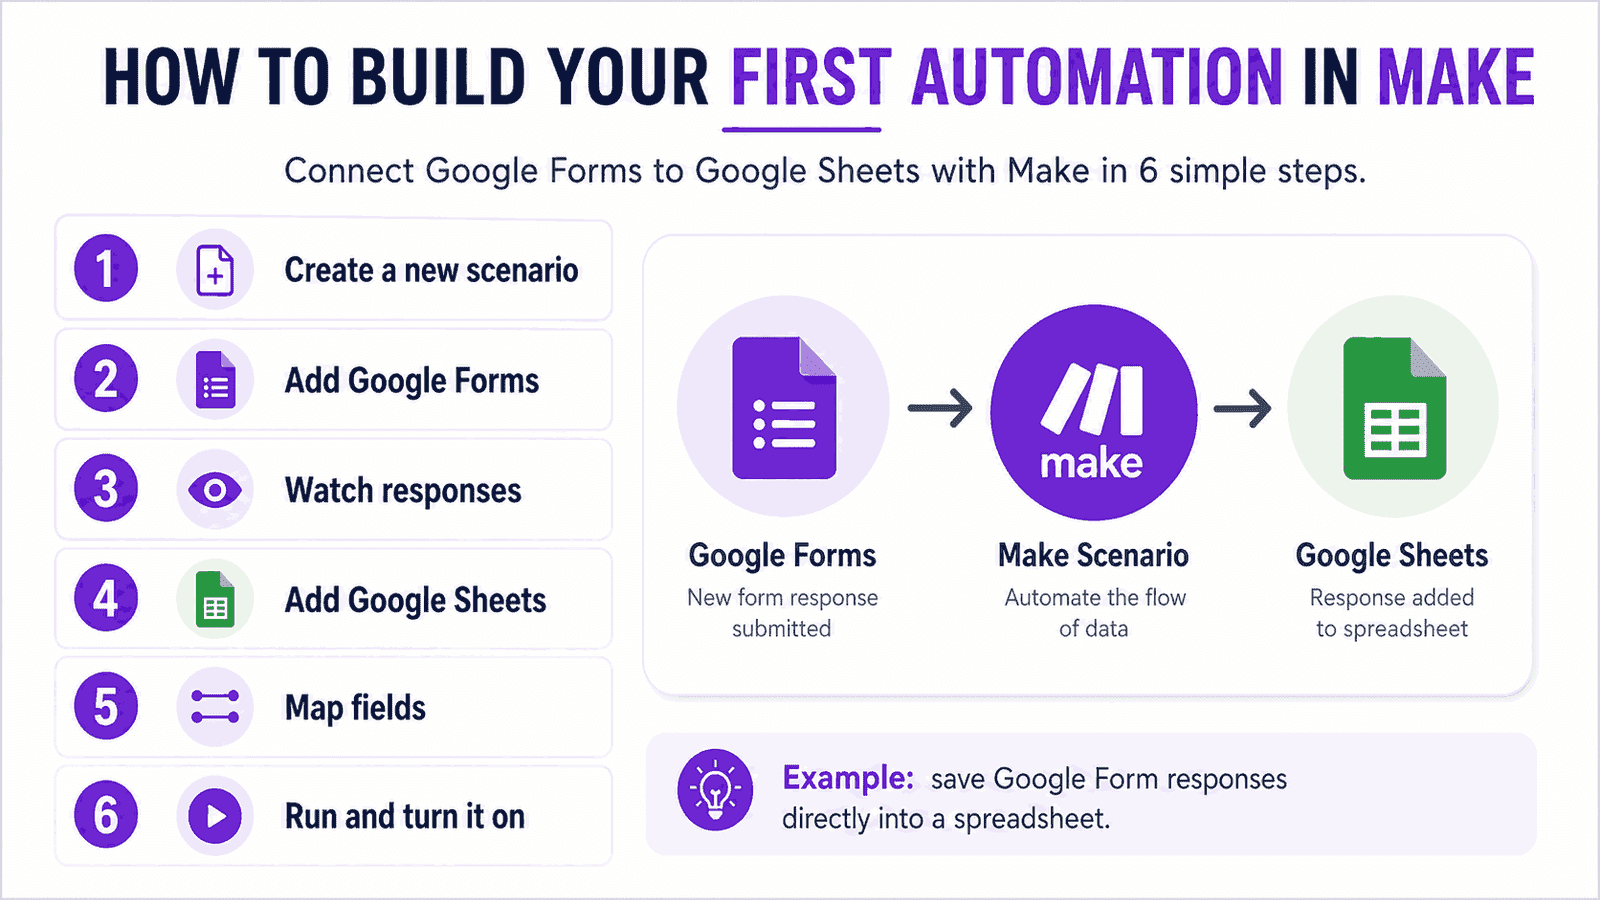
Let’s make this real. Here’s exactly how to build your first automation on Make from scratch. This one will save your Google Form answers directly into a Google Sheet.
- Go to make.com and sign up for a free account
- Once you’re in, click “Create a new scenario”
- You’ll see a blank canvas with a circle in the middle — click the “+” button
- Search for Google Forms and click on it
- Choose “Watch Responses” as your trigger — this means “when someone fills the form”
- Connect your Google account and choose which form you want to use
- Now click the small circle that appears on the right side of your Google Forms block
- Search for Google Sheets and click on it
- Choose “Add a Row” — this means “add the form answer as a new row”
- Connect to your Google account again and choose your spreadsheet
- Match the form fields to the right columns in your sheet
- Click “Run once” to test it — go fill in your form and watch what happens
- If it works, turn on the scheduling (every 15 minutes is fine)
That’s your first real automation running. No code. No money. Done.
The Stuff Nobody Tells You Before You Start
Both tools are free — but both have real limits.
Zapier’s 100 free tasks disappear faster than you think. If you’re running an automation that checks for new emails every hour, that alone can eat up your limit in a few days.
Make is more generous but the interface can genuinely stress people out. I’ve seen friends close the tab and never come back. If that’s you — take a breath, watch one 10-minute YouTube video on Make basics, and come back. It clicks eventually.
Also — both tools need access to your apps. You’ll connect your Google account, your email, whatever apps you use. This is normal and safe, but just know they’ll have permission to read and write to those apps. Only connect what you actually need.
Neither tool is magic. They automate things that are already happening — they don’t think for you. But that’s exactly the point. They handle the boring repeat tasks so your brain is free for the actual work.
Stop Thinking, Start Doing
I spent way too long comparing Zapier vs Make before I actually tried either of them.
The truth is — one afternoon of actually using the tool teaches you more than a week of reading about it. The comparison tables, the reviews, the YouTube videos — they all have a point. But nothing replaces just opening the tool and building something.
Pick Make if you want the better free plan. Pick Zapier if you want the simpler start. Either way — build one automation this week. Something small. Something that saves you even 10 minutes.
Once you feel that first automation actually working, you’ll immediately start thinking of five more.
That’s when it gets fun.
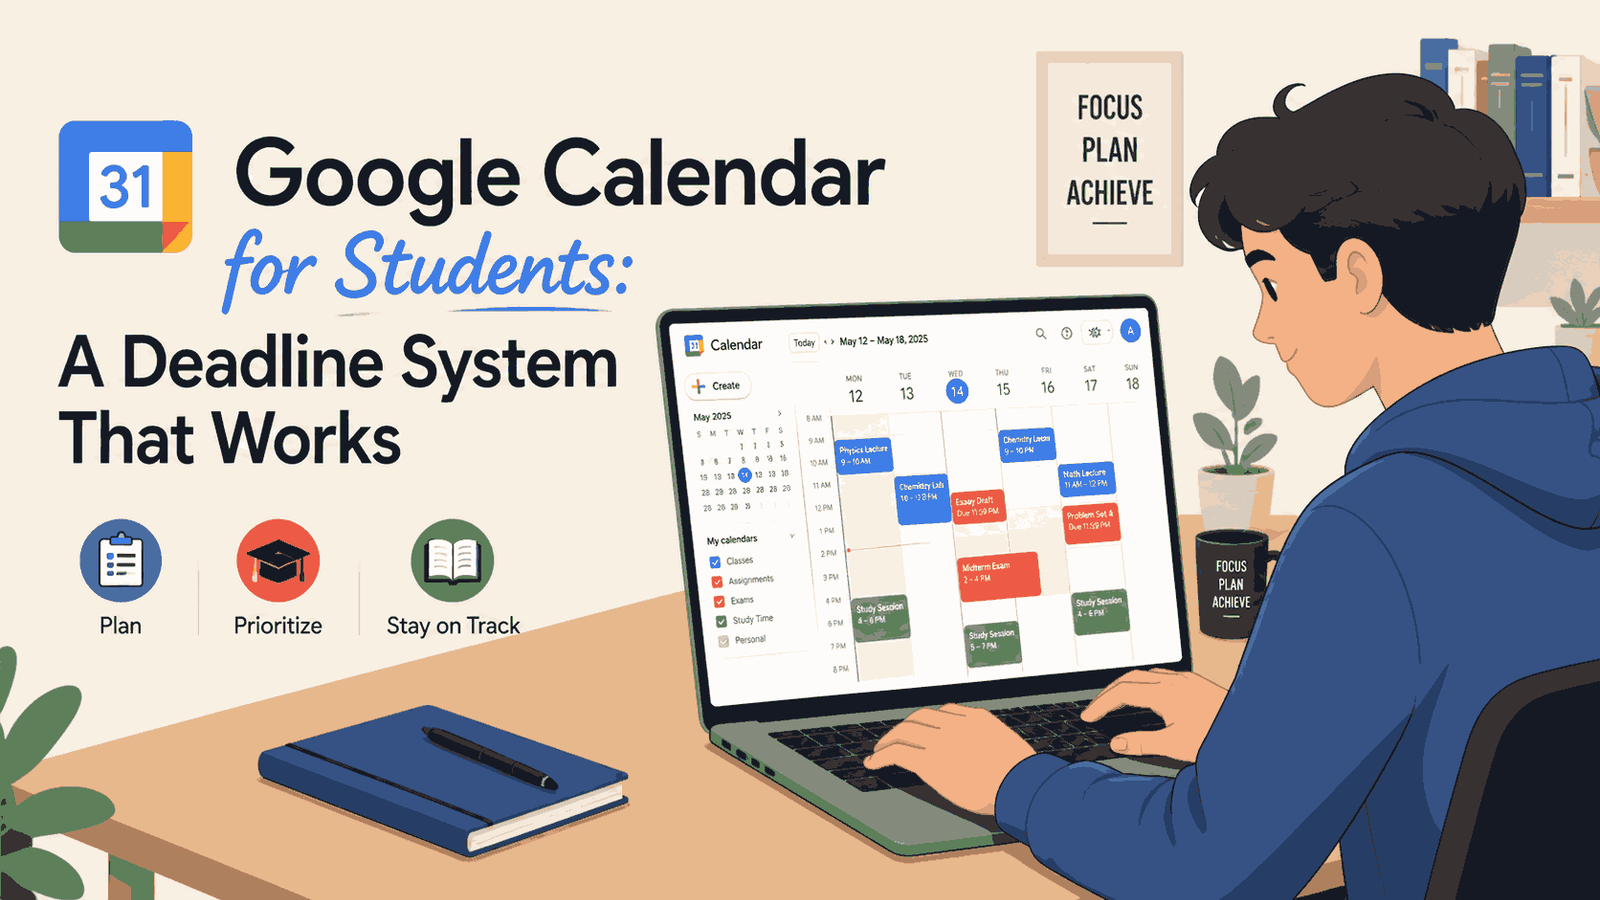
Want to go further? Check out our guide on how to automate your full study workflow — it covers everything from notes to emails to weekly planning.
Noman Ali is a student and beginner digital skills writer behind NaqVentures. He writes practical guides about AI tools, automation, SEO, blogging, and student productivity based on real learning, testing, and beginner-focused workflows.


Very thoughtful insights
Hi Sarah,
Thank you for your thoughtful comment I am really glad you found the comparison helpful.
Zapier and Make both have strong use cases, and choosing the right one really depends on the complexity of workflows and how much control you need. I’ll be exploring more real-world use cases and deeper comparisons in upcoming posts.
Appreciate you taking the time to share your thoughts.